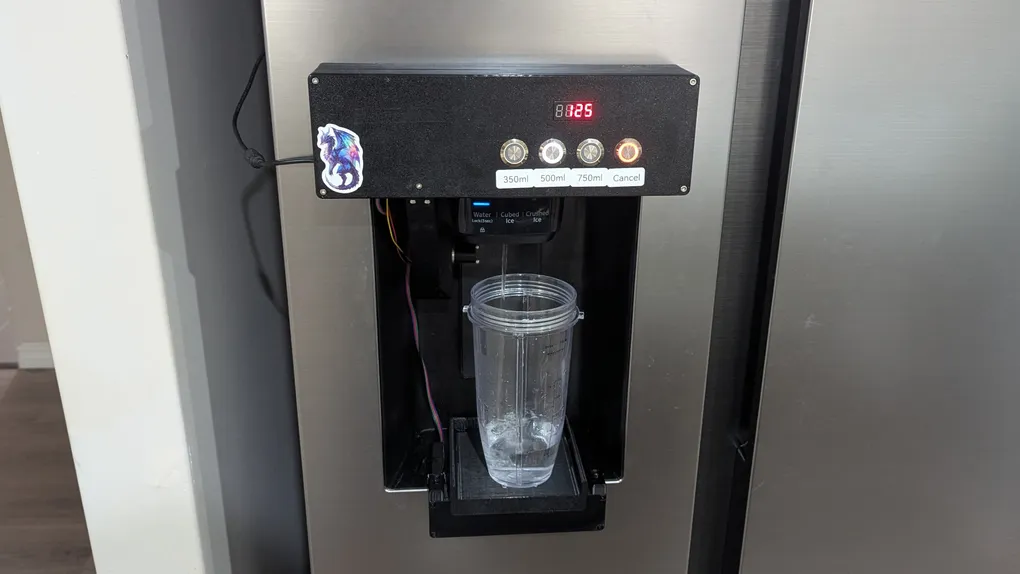
Automating a Fridge Water Dispenser, Version 2
A while back, I built a device that automatically dispenses water from our fridge, using a load cell to measure weight, a tiny hobby servo to press the dispenser button, and ESPHome to glue it all together. It’s been running in daily use ever since, filling shakes for me every morning. But a few things about the original build had been nagging at me, and I finally had some time to sit down and build a proper version 2.
What was wrong with version 1?
The original dispenser worked, but it had a few rough edges that got more annoying the longer I used it:
- The SG90 hobby servo is a cheap, open-loop PWM servo. There’s no feedback, no way to know if it actually reached the position you asked for, and the horn positioning drifted over time as the plastic gears wore in. This was the cause of the “stops dispensing” issue I called out at the end of the original post - the mechanism would shift slightly and the servo arm would no longer reach the button.
- There was no proper timeout. If something went wrong - the container overflowed, the dispenser was stuck in ice mode, or the weight reading stalled for some other reason - the only thing stopping it from filling forever was the target weight itself never being reached. This wasn’t just a theoretical risk - it actually happened, and we ended up with a puddle on the kitchen floor to clean up. That moved “add a proper timeout” straight to the top of the v2 list.
- All the logic lived directly in ESPHome YAML lambdas. That’s fine for something simple, but it meant I couldn’t write a single automated test for the fill logic. Every change had to be verified by physically standing at the fridge with a bottle and a stopwatch.
- The whole assembly was attached to the fridge with tension from a V-slot extrusion and, eventually, a stretched piece of elastic borrowed from my wife’s sewing kit. It worked, but taking it off to clean behind it or adjust anything was more fiddly than I wanted.
So, version 2 - same goals as before, but built to actually address these problems properly.
Design goals for v2
- Replace the SG90 with something that gives real position feedback, so I can trust that “on” actually means on.
- Add a hard timeout so a stalled or overflowing fill can never run indefinitely.
- Split the core dispensing logic out of the ESPHome YAML and into a real, unit-testable C++ component.
- Make the whole thing quickly removable, rather than relying on friction and tension alone.
Hardware changes
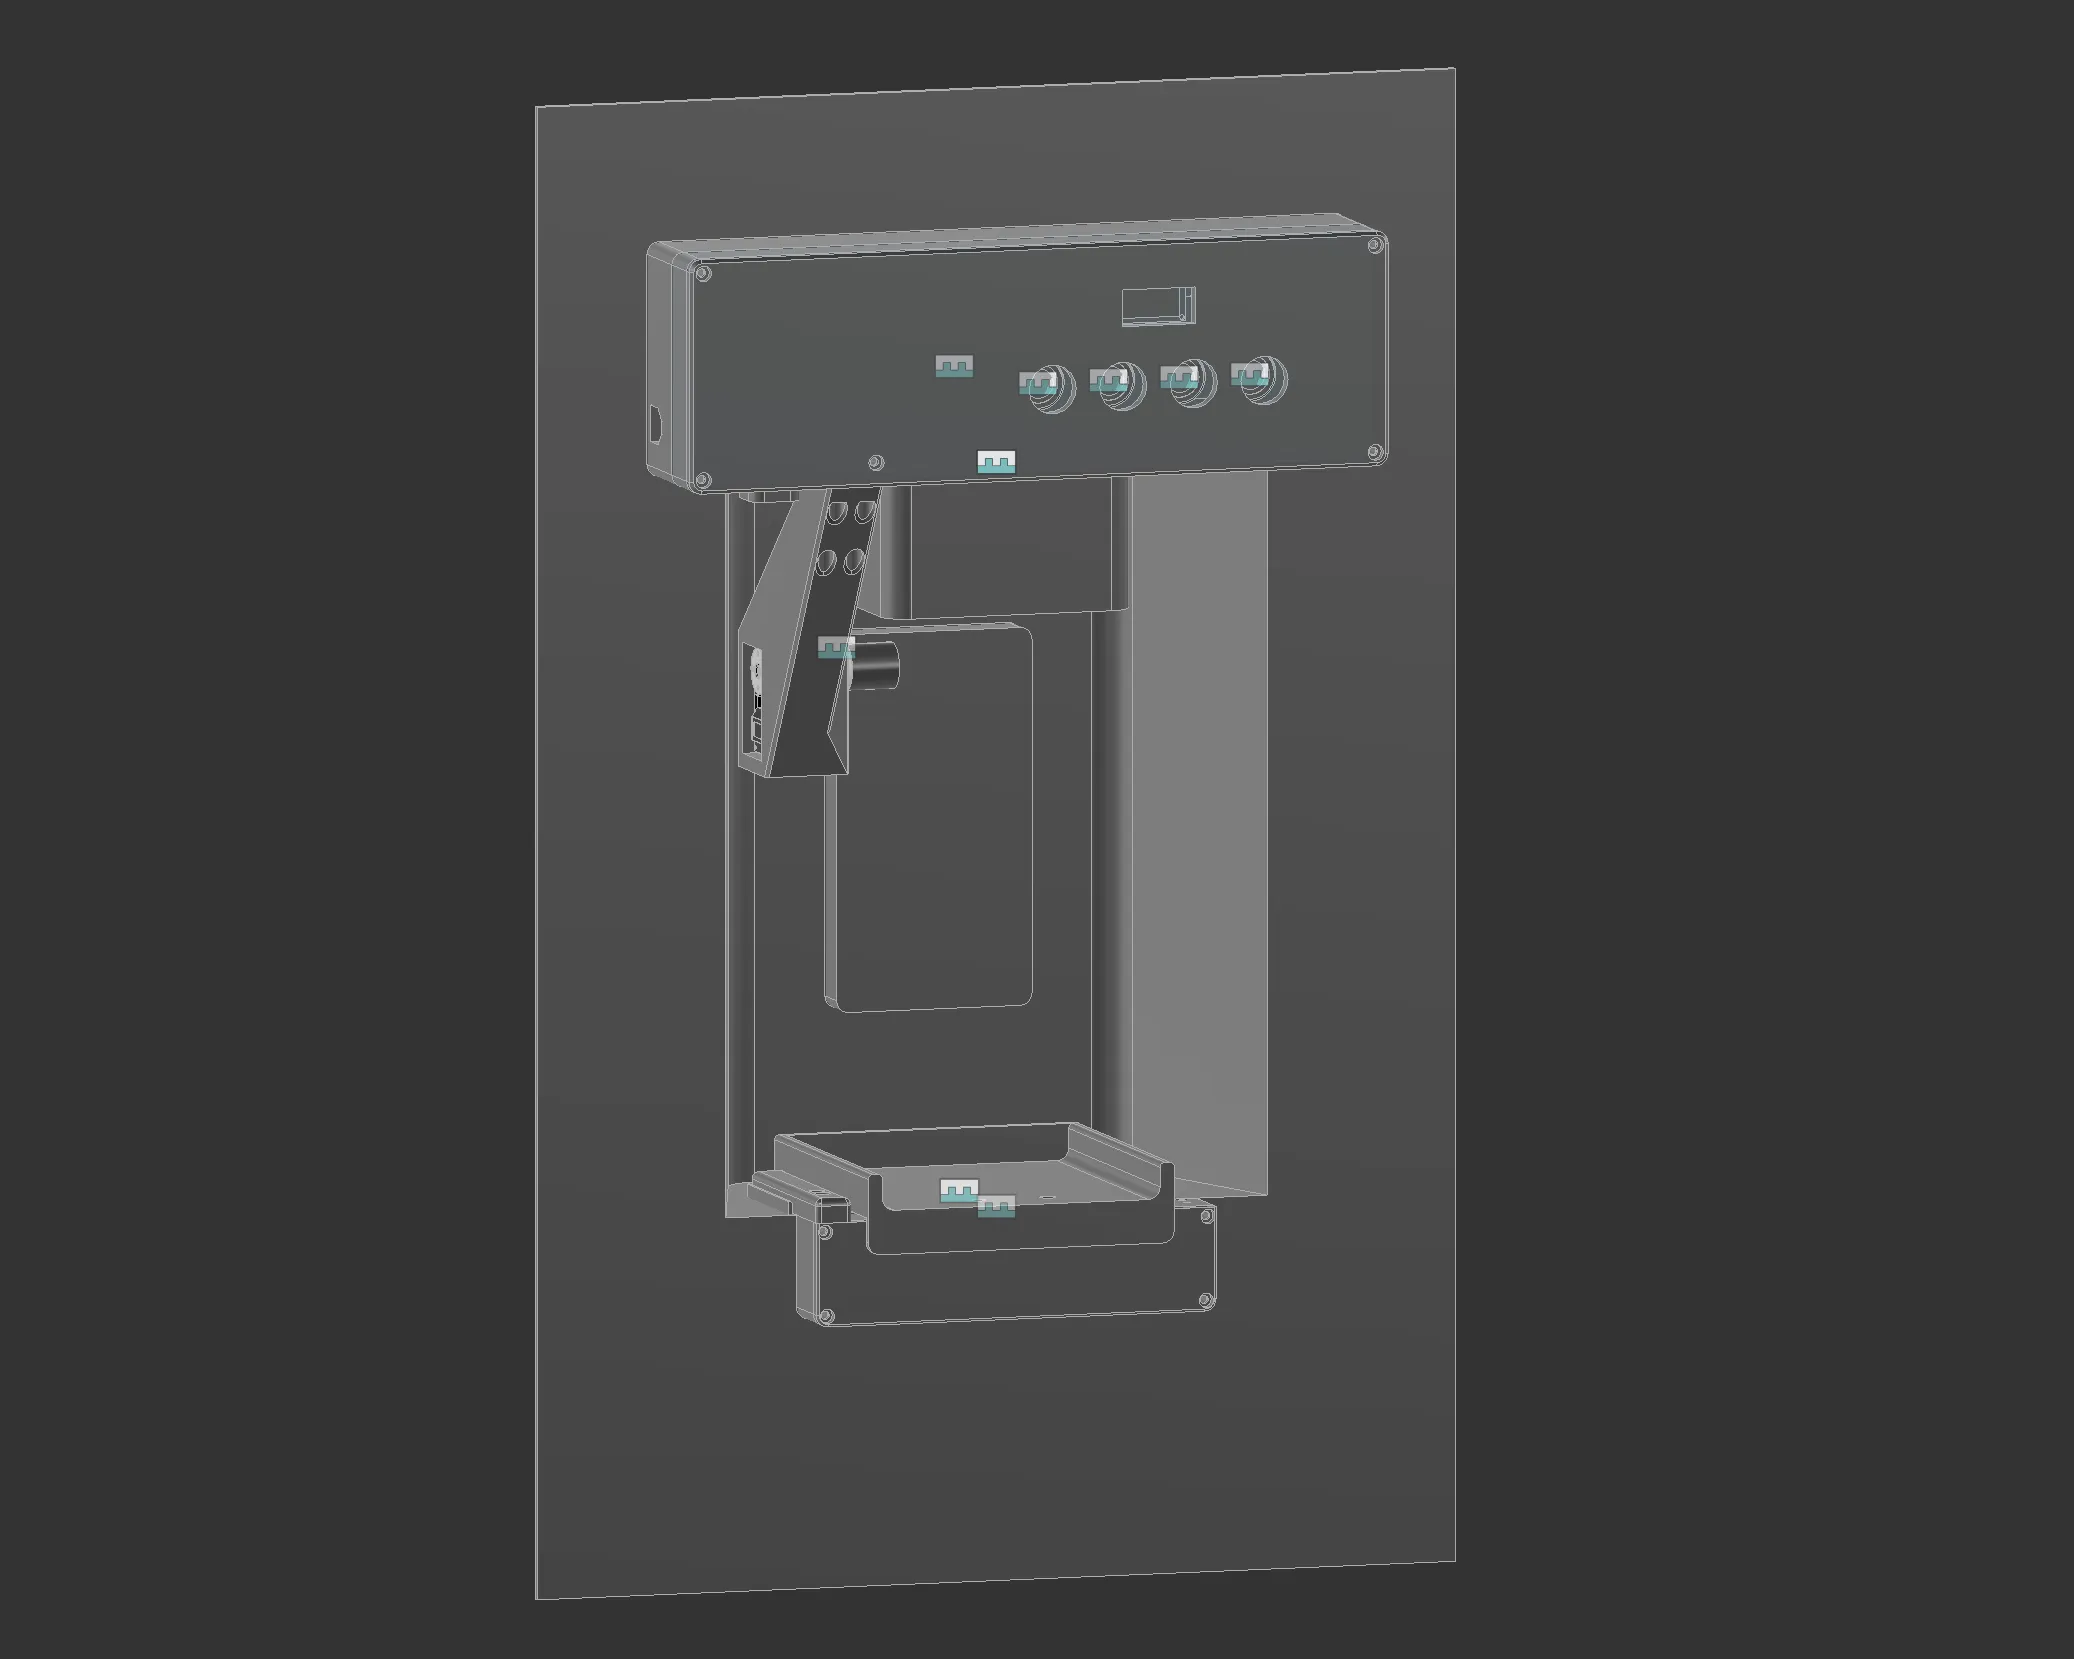
One quirk of the Fusion design worth mentioning: my first pass at the top case came out 20mm too short to fit everything - the ESP32, the driver board, the buttons, and the display all needed more depth than I’d allowed for. Rather than redo all the sketches, I added a 20mm spacer joint between the front panel and the rest of the case to buy back the space. Because the buttons and display are positioned relative to that joint rather than as fixed dimensions from the case origin, they all ended up sitting 20mm further back than they visually look like they should in the model. It works fine in practice, but if you’re ever staring at the Fusion file wondering why everything is offset by exactly 20mm, that’s why.
As with the original build, the design files won’t match your fridge, but they’re here as a reference. You can get the Fusion 360 version or the STEP version.
A proper serial servo: the ST3215
Instead of the SG90, I switched to a Waveshare ST3215 serial bus servo. Unlike a hobby PWM servo, the ST3215 talks over a half-duplex UART protocol (the STS/SCServo protocol used across that whole family of serial servos), which means:
- You get absolute position feedback - you can ask the servo where it currently is, rather than hoping it went where you told it.
- Position, speed, and acceleration are all independently configurable over the serial bus, rather than being at the mercy of a fixed PWM pulse width and whatever the internal potentiometer feels like doing that day.
- It’s a full rotation. Position is dealt with as an absolute value from 0-4095, where each unit is 1/4096th of a turn.
The ESP32 talks to the servo over UART1 at 1 Mbps, via a common Waveshare serial servo driver board that sits between the two. It supports both USB and TTL serial, and handles the half-duplex bus direction switching internally, so I didn’t need to add any bridging resistor or echo-flushing logic of my own.
There’s no ESPHome component for this servo family, so one had to be written - more on that in the software section.
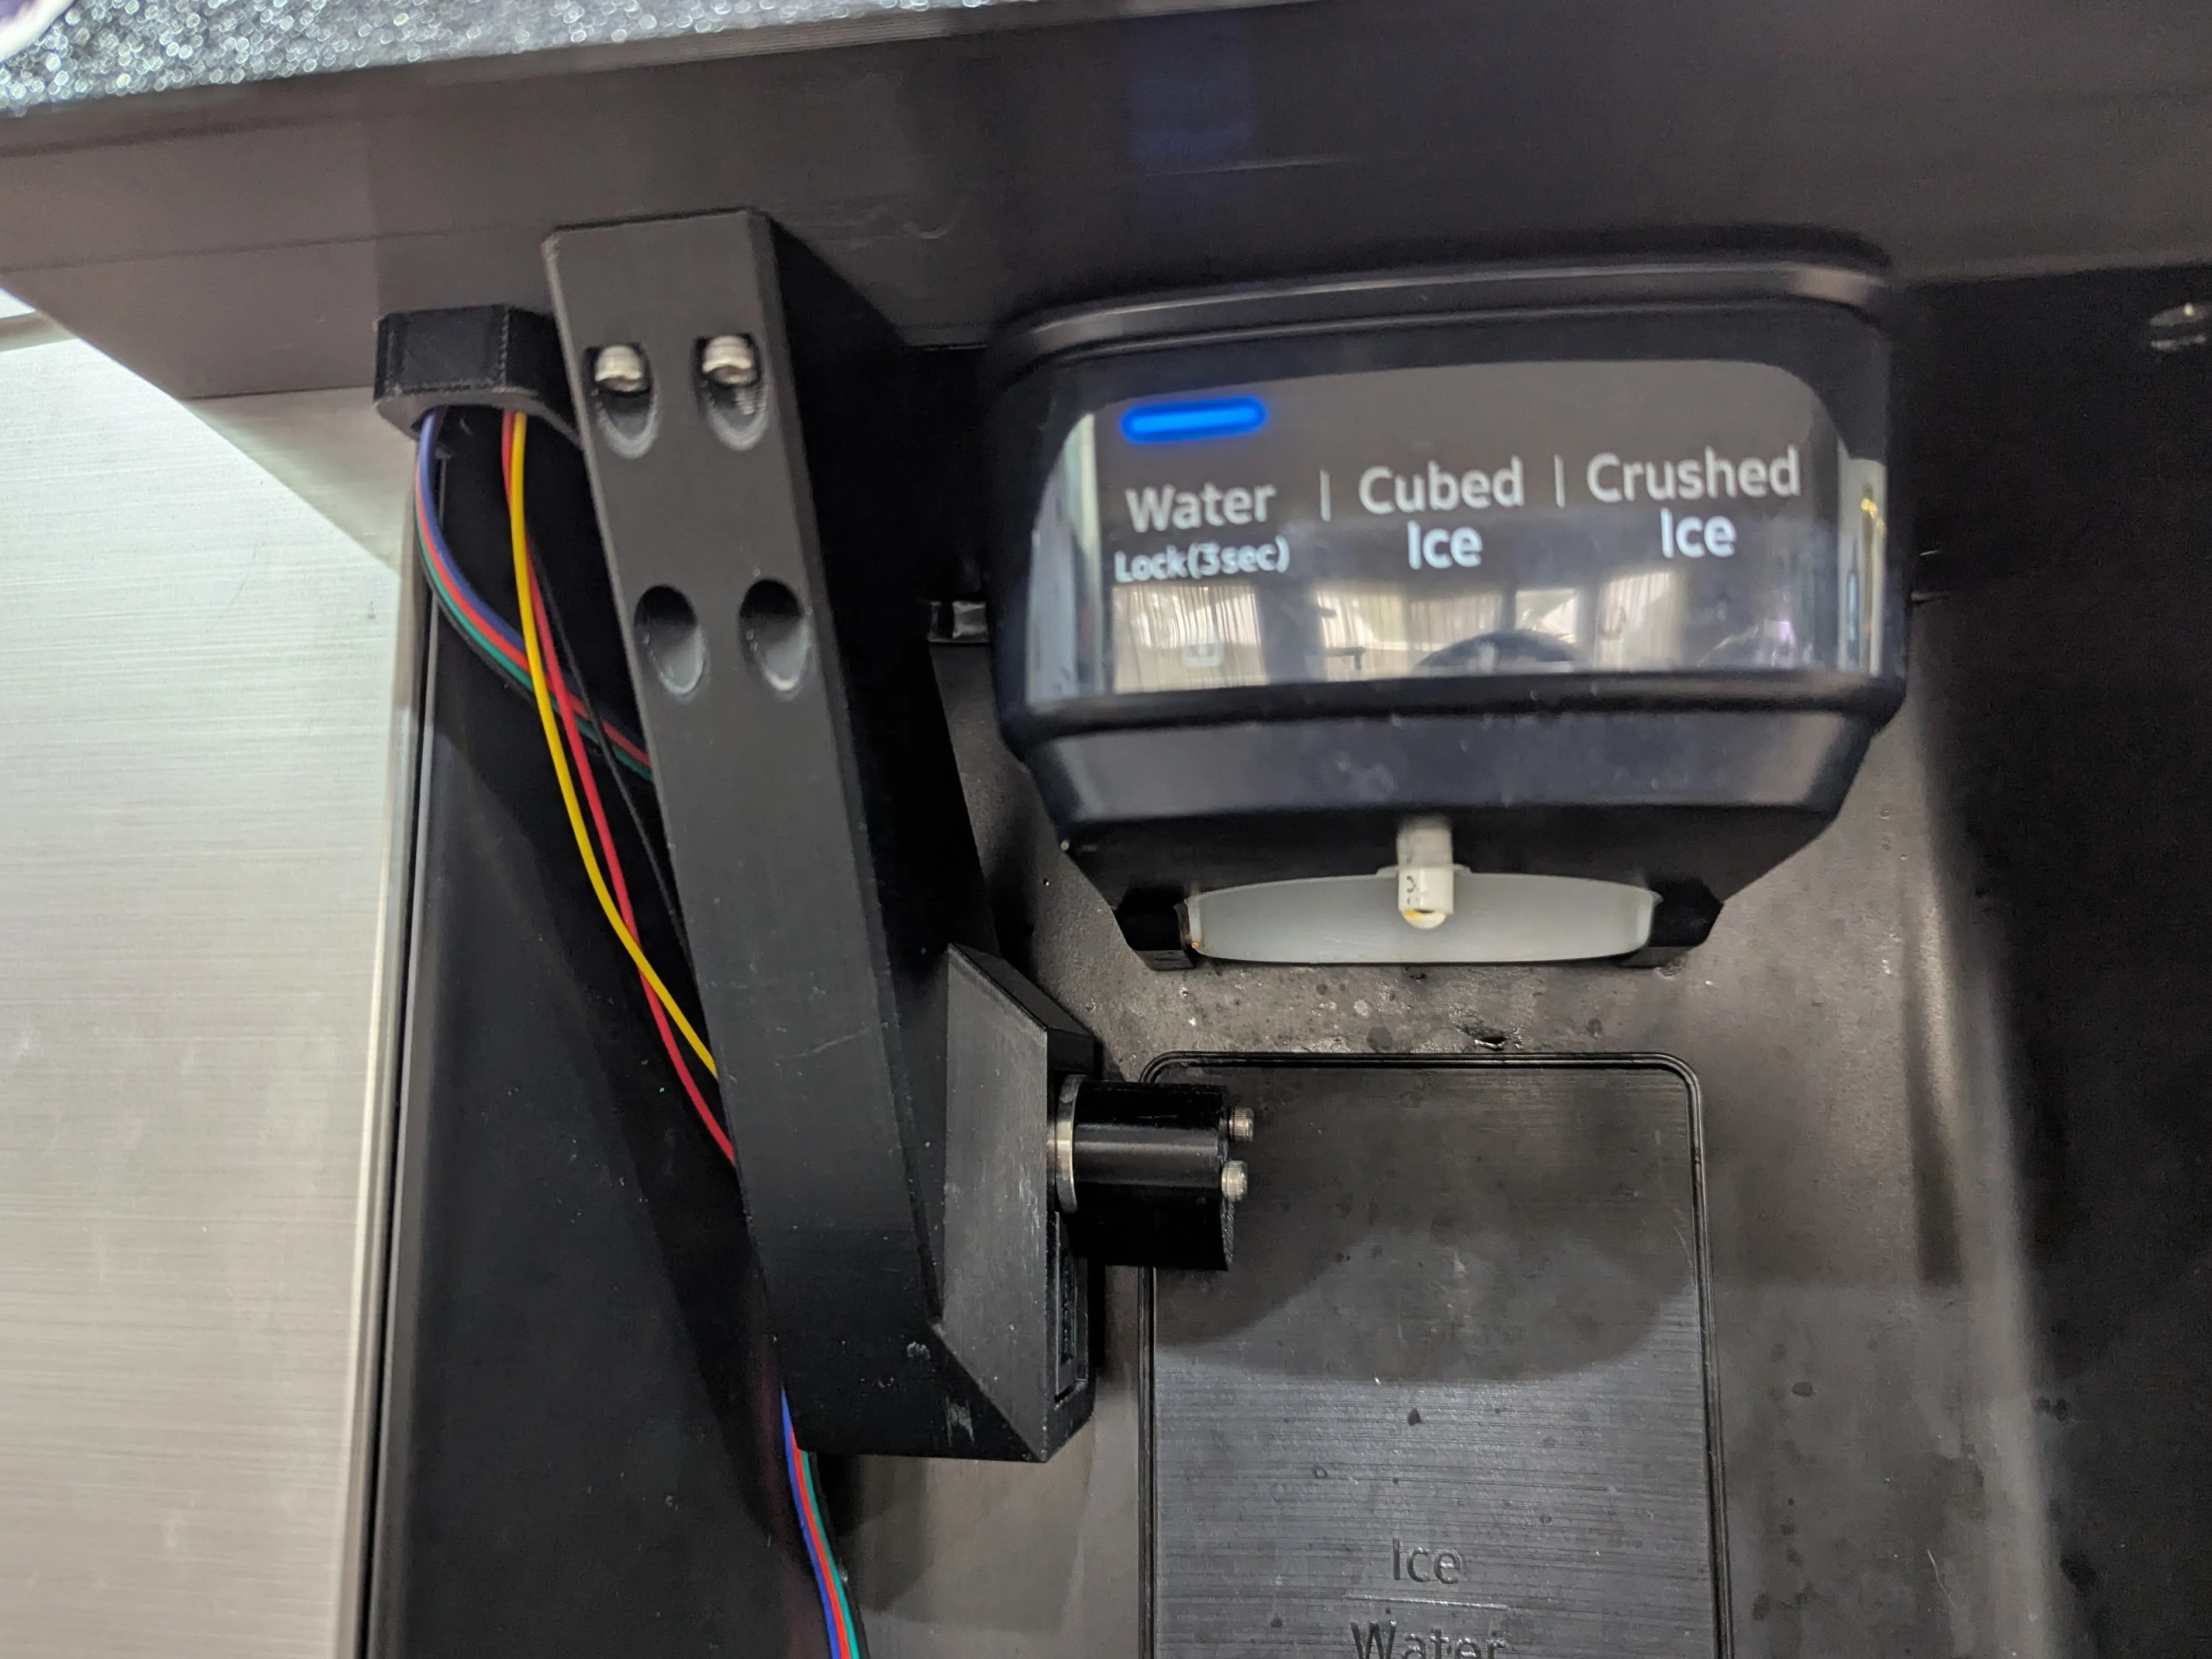
Holding the servo firmly in the right position turned out to matter more than I expected, since any play in the mount translates directly into the arm missing the button. Rather than moulding the servo mount straight into the control box, it’s a separate bolt-on part, designed so its print orientation gives the strongest layer lines for the load it actually sees in use. The rest of the case is only reinforced where it actually needed it - the servo mount and the areas around it got the thicker walls and extra structure, while the rest of the case stayed as light as it reasonably could.
Two parts, held on with magnets
The other big physical change is that the dispenser is now split into two separate parts instead of one combined unit:
- A control box, mounted above the fridge cubby, containing the ESP32, the ST3215 driver electronics, the buttons, and the TM1637 display.
- A weighing platform, sitting at the bottom of the cubby, holding the load cell and the plate the bottle or cup actually sits on.
One limitation of covering the front of the fridge like this: you can no longer see the original ice/water selector buttons underneath, since the control box sits directly in front of them. This is the same trade-off as v1 - the servo only presses the water button, so as long as the fridge is left in water mode, it’s a non-issue. We’ve just gotten used to leaving it in water mode and working around it, rather than solving it properly with a way to view or reach the original selector. Having said that, you know instantly if it’s in the wrong mode due to the different sound it makes for ice dispensing!
Both parts attach using magnets embedded in the printed parts, rather than the previous V-slot-and-elastic approach. I had some spare 10mm diameter x 5mm thick magnets lying around, which got glued into the bottom of each box, with about 1mm of plastic left between the magnet and the fridge surface. This means the whole thing can be pulled off in a few seconds for cleaning, or to get it out of the way entirely, and reattaches in the same spot every time without needing to be re-tensioned.
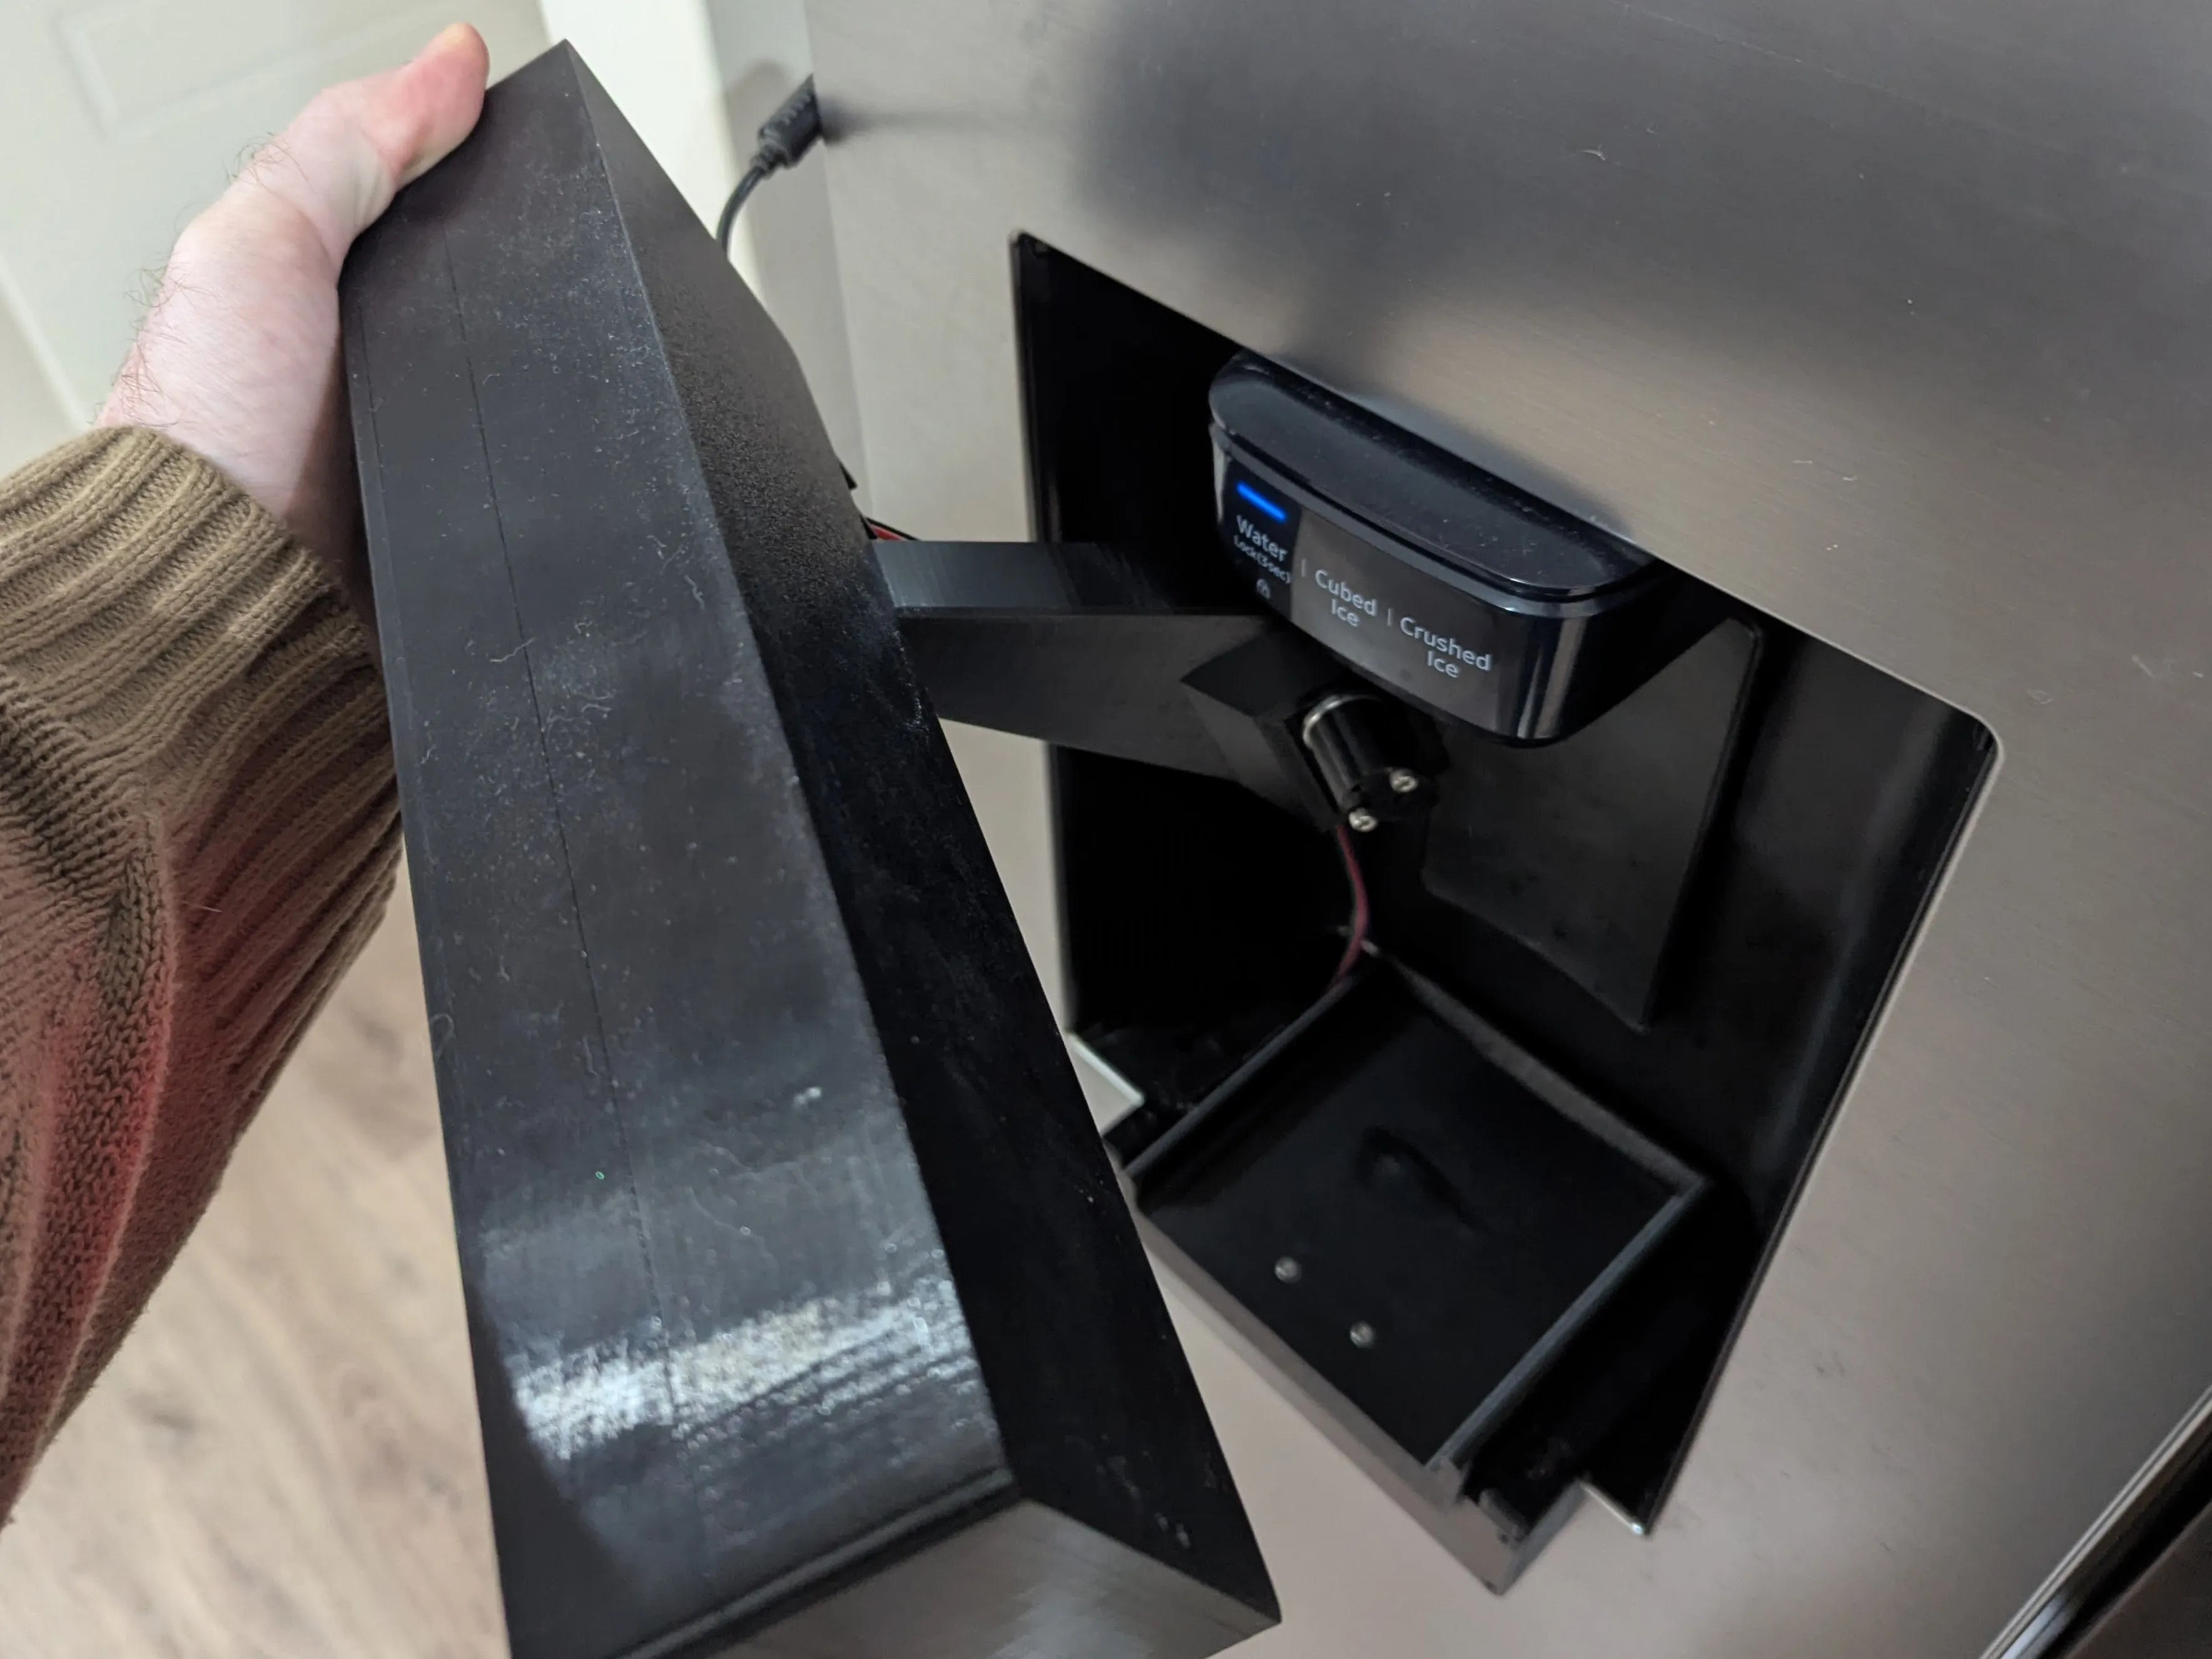
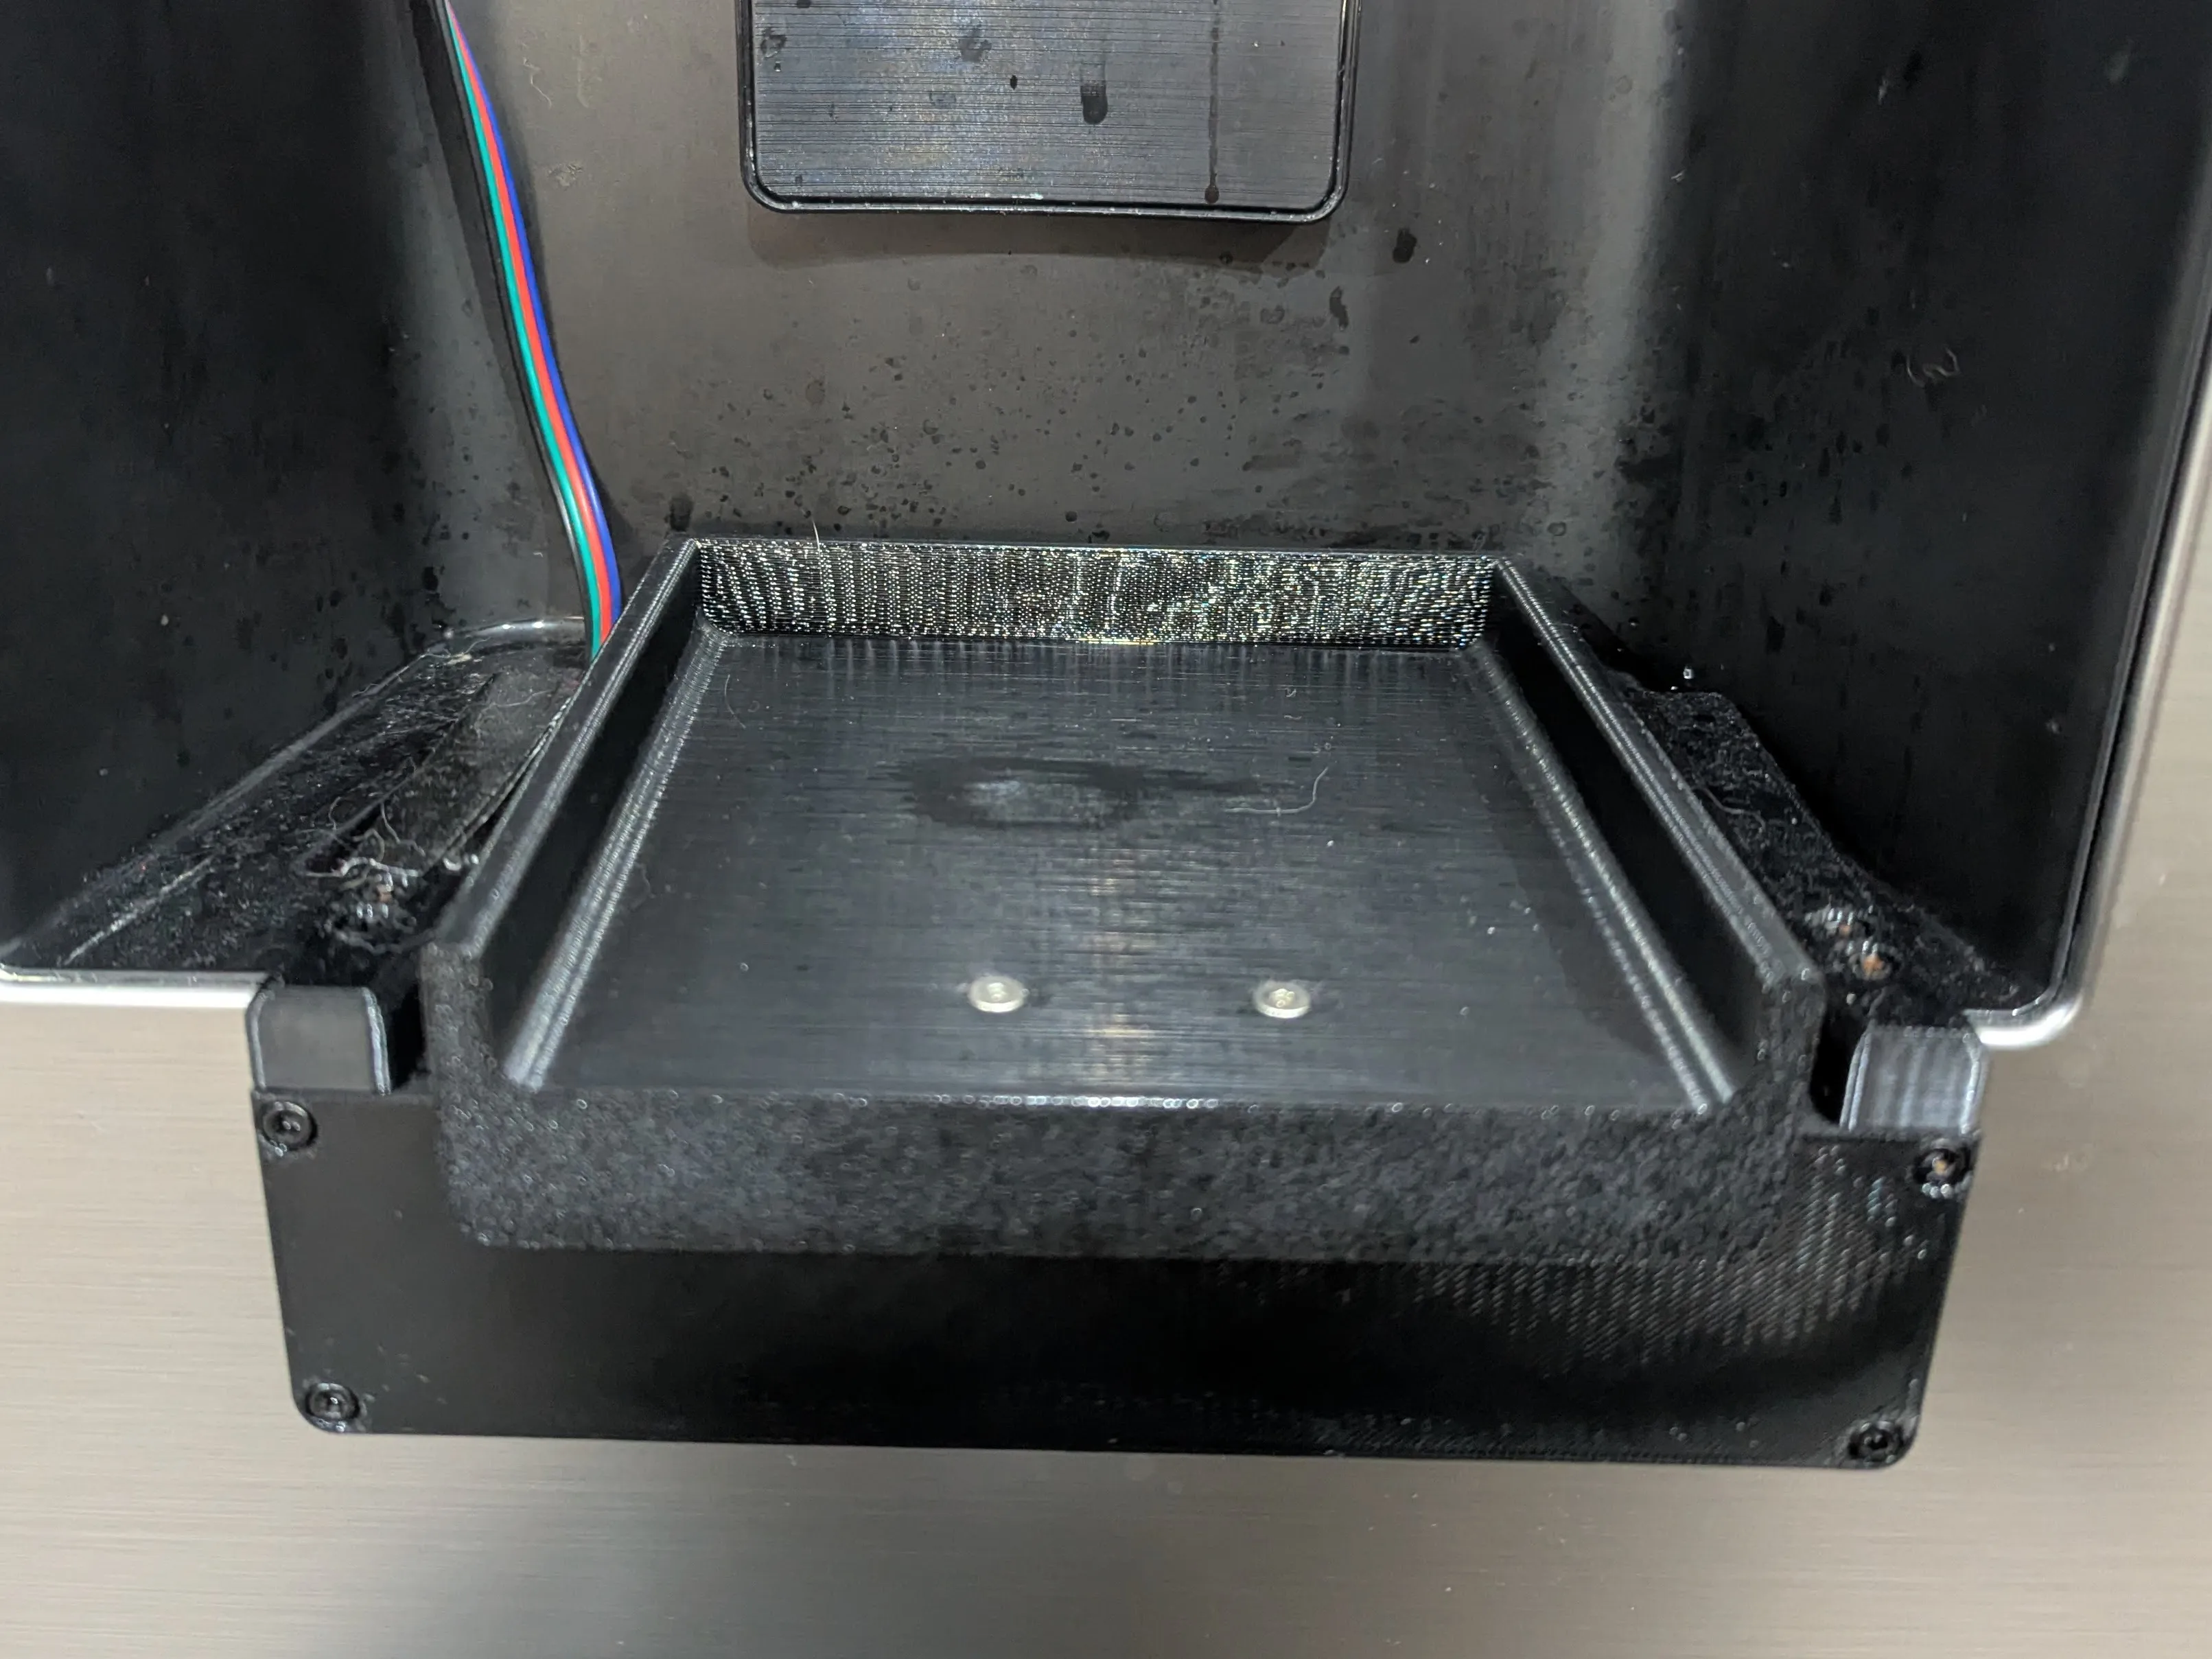
The weighing plate itself was deliberately designed to be as thin as possible - in the original version, some of our taller bottles didn’t fit under the fridge dispenser nozzle with the platform in the way, so shaving every spare millimetre off the plate thickness mattered. That goal was met, but it’s created a new problem: the plate still flexes more than I’d like under load. In some cases it flexes enough to actually rest on the bottom of the fridge cubby, which means the load cell stops seeing the full weight and the fill logic never sees the container getting heavier - not too different in symptom to the stall condition the timeout is meant to catch. This isn’t just theoretical either - you can actually see it happen in the video above, where a 500ml target fill ended up overfilling by about 50ml, because the plate was touching the bottom of the cubby for part of the fill and the scale wasn’t reading the true weight increase. There’s also a second issue that’s more of an annoyance than a fault: when water is spilled or drips onto the plate, it just sits there in a puddle rather than draining away, instead of running off harmlessly. Both of these point at the same fix - a metal plate instead of the printed one, angled slightly so any water runs off the front rather than pooling. That’s on the list for a v3 revision of just this one part.
Software: splitting logic out of YAML
This was the change I was most looking forward to. In the original build, everything - taring, the fill loop, the
stop conditions - was written as ESPHome lambda: blocks directly inside the YAML configuration. That’s fine for
getting something working quickly, but there’s no way to unit test a lambda embedded in a YAML file, and every
change needed a full compile-and-flash cycle to verify.
For v2, I pulled the dispensing logic out into its own ESPHome external component, with the hardware-specific bits behind small interfaces so the logic itself can be compiled and tested completely independently of any ESP32 or real hardware.
The full source is on GitHub: freefoote/fridge-dispenser-v2.
Architecture
The project ended up with four layers:
st3215/- an ESPHome external component implementing the STS serial protocol over UART, exposing a simplewrite_position()API. Nothing existed for ESPHome for this servo family, so this one is new - I had an LLM assistant write the protocol implementation for me, based on the STS/SCServo register documentation.dispenser_logic/- the actual business logic: a small state machine, talking to the hardware only through two pure-virtual interfaces (IServoControllerandIWeightSensor). This is what actually gets unit tested.tests/- a native Google Test suite that compiles and runs on my desktop, using mock implementations of those two interfaces. No ESP32, no servo, no load cell required.dispenser.yaml- the ESPHome configuration that wires the real UART, HX711 sensor, and buttons up to thest3215anddispenser_logiccomponents.
The key trick that makes the logic testable is the interface boundary:
// interfaces.h
// Pure-virtual interface for the servo, allowing mock injection in tests.
class IServoController {
 public:
  virtual ~IServoController() = default;
  virtual void set_active(bool active) = 0;
  virtual void write_position(int16_t position) = 0;
};

// Pure-virtual interface providing the current scale reading.
class IWeightSensor {
 public:
  virtual ~IWeightSensor() = default;
  virtual float get_weight_grams() = 0;
};
DispenserLogic only ever talks to an IServoController* and an IWeightSensor*. In production, those are backed
by the real ST3215 component and the HX711 sensor wrapper. In tests, they’re backed by simple mock classes that
just record calls and let the test set whatever weight it wants.
The fill state machine
The logic itself is a small state machine with two states, IDLE and DISPENSING. Starting a fill records the
current weight as tare and the requested quantity as the target, then engages the servo:
void DispenserLogic::start_dispensing(float quantity_grams) {
  if (state_ == DispenserState::DISPENSING) {
    ESP_LOGW(TAG, "start_dispensing() called but already DISPENSING - ignoring request");
    return;
  }

  tare_weight_ = weight_->get_weight_grams();
  target_weight_ = quantity_grams;

  last_stall_weight_ = 0.0f;
  dispense_start_time_ = -1.0f;  // Sentinel - initialised on first update()

  state_ = DispenserState::DISPENSING;
  move_servo_to_on();
}
It’s then polled every 100ms from an ESPHome interval:, where it checks two conditions: has the target been
reached, or has the weight stalled?
void DispenserLogic::update(float current_time_s) {
  if (state_ != DispenserState::DISPENSING) return;

  if (dispense_start_time_ < 0.0f) {
    dispense_start_time_ = current_time_s;
    last_weight_increase_time_ = current_time_s;
  }

  float actual_weight = weight_->get_weight_grams() - tare_weight_;

  // Overfill check: stop immediately once the target is reached.
  if (actual_weight >= target_weight_) {
    stop_dispensing();
    on_dispensing_complete_.trigger();
    return;
  }

  // Stall check: has the weight increased meaningfully recently?
  if (actual_weight - last_stall_weight_ >= stall_min_increase_) {
    last_weight_increase_time_ = current_time_s;
    last_stall_weight_ = actual_weight;
  } else if (current_time_s - last_weight_increase_time_ >= stall_timeout_) {
    stop_dispensing();
    on_stall_abort_.trigger();
  }
}
The 5 second overflow timeout
This is the fix for the “fill forever” problem from v1. If the measured weight doesn’t increase by at least 1 gram
within a 5 second window, the dispenser assumes something is wrong - an overflowing cup, a blockage, or the fridge
having been left in ice mode instead of water mode - and stops immediately, releasing the servo. Both the timeout
(stall_timeout) and the minimum increase threshold (stall_min_increase) are configurable from the ESPHome YAML:
dispenser_logic:
  id: dispenser
  servo: dispenser_servo
  weight_sensor: weight
  stall_timeout: 5.0
  stall_min_increase: 1.0
  on_position: ${servo_on_position}
  off_position: ${servo_off_position}
  on_stall_abort:
    - script.execute: stop_dispensing
  on_dispensing_complete:
    - script.execute: stop_dispensing
In both the stall and the overfill case, the servo is unconditionally moved back to the off position, so there’s no scenario where a logic bug leaves the dispenser stuck open.
Unit testing without any hardware
Because DispenserLogic never touches ESPHome, UART, or GPIO directly, the whole state machine can be exercised
from a native Google Test binary. Here’s the actual stall-detection test:
TEST(SafetyTests, StallDetectionTriggers) {
  MockServo servo;
  MockWeightSensor weight;
  DispenserLogic logic(&servo, &weight);

  weight.set_weight(0.0f);
  logic.start_dispensing(100.0f);

  // Servo moved to ON position
  EXPECT_EQ(servo.position_calls().size(), 1);
  EXPECT_EQ(servo.position_calls()[0], 2559);

  // Simulate time passing with no weight increase (default stall_timeout is 5.0s)
  logic.update(0.1f);
  logic.update(1.0f);
  logic.update(2.0f);
  logic.update(3.0f);
  logic.update(4.0f);
  logic.update(5.1f);   // exceeds 5.0s timeout, should trigger stall

  // Servo should be moved back to OFF position
  EXPECT_EQ(servo.position_calls().size(), 2);
  EXPECT_EQ(servo.position_calls()[1], 2047);
  EXPECT_EQ(logic.state(), DispenserState::IDLE);
}
The full suite covers 13 cases: correct stop weight for each of the three fill buttons, tare handling, stall detection and reset-on-increase, overfill detection, state guards against phantom fills, and recovery into a fresh fill cycle after a stall. All of it runs on my desktop with CMake and CTest, no ESP32 required:
cmake -S tests -B tests/build -DCMAKE_BUILD_TYPE=Debug
cmake --build tests/build
ctest --test-dir tests/build -C Debug --output-on-failure
This turned out to be the single biggest quality-of-life improvement of the whole rebuild. I could refactor the stall detection logic, or tweak the overfill check, and know within a couple of seconds whether I’d broken anything - rather than needing to walk to the kitchen with a water bottle every time.
The ESPHome component for the ST3215
Since there wasn’t an existing ESPHome component for this servo family, the st3215 component talks the STS
protocol directly - written with the help of an LLM assistant, working from the STS/SCServo register documentation
rather than from any existing ESPHome example. Packets are simple: a two-byte header, the servo ID, a length byte,
an instruction, parameters, and a checksum:
void ST3215::write_packet(uint8_t instruction, const uint8_t *params, uint8_t param_len) {
  // Packet layout:
  //   [0xFF][0xFF][ID][LEN][INSTR][PARAMS...][CHECKSUM]
  uint8_t packet[16];
  uint8_t packet_size = 6 + param_len;

  packet[0] = 0xFF;
  packet[1] = 0xFF;
  packet[2] = servo_id_;
  packet[3] = param_len + 2;
  packet[4] = instruction;

  for (uint8_t i = 0; i < param_len; i++) {
    packet[5 + i] = params[i];
  }

  packet[5 + param_len] = checksum(servo_id_, packet[3], instruction, params, param_len);
  this->write_array(packet, packet_size);
}
Moving the servo to a position means writing a contiguous block of registers in one packet - torque enable, acceleration, target position, and goal speed all get set with a single write to keep everything in sync:
void ST3215::write_position(int16_t position, uint16_t speed, uint8_t acceleration) {
  // Ensure torque is enabled (register 0x28), or the servo ignores position commands.
  uint8_t torque_params[2] = { REG_TORQUE_SWITCH, 0x01 };
  write_packet(0x03, torque_params, 2);

  uint8_t acc_params[2] = { REG_ACCELERATION, acceleration };
  write_packet(0x03, acc_params, 2);

  // Contiguous block: target position (0x2A), time placeholder (0x2C), goal speed (0x2E).
  uint8_t move_params[7] = {
    REG_TARGET_POS,
    (uint8_t)(position & 0xFF), (uint8_t)((position >> 8) & 0xFF),
    0x00, 0x00,
    (uint8_t)(speed & 0xFF), (uint8_t)((speed >> 8) & 0xFF),
  };
  write_packet(0x03, move_params, 7);
}
Reading responses back is handled in loop(), which drains whatever bytes ESPHome’s UART driver has buffered,
resyncs on the 0xFF 0xFF header if anything got out of alignment, and waits until a complete packet has arrived
before parsing it - which is how check_servo_status() is able to confirm the servo actually replied with its
current position on boot, rather than just hoping the write worked.
Because the ST3215 class implements the same IServoController interface used by the tests, the ESPHome YAML
just wires it straight into dispenser_logic:
uart:
  id: st3215_uart
  tx_pin: GPIO26
  rx_pin: GPIO27
  baud_rate: 1000000

st3215:
  uart_id: st3215_uart
  servo_id: 1
  id: dispenser_servo
Calibrating the new servo
The ST3215 uses an absolute position range of 0-4095 (each unit is 1/4096th of a full rotation), which needed
recalibrating against the actual dispenser button - the numbers are completely different to the 0-100% range the
old SG90 used. I exposed a number: entity in the ESPHome dashboard to jog the servo manually while working out
the right values:
number:
  - platform: template
    name: "Servo Position Calibration"
    id: servo_cal_position
    min_value: 0
    max_value: 4095
    step: 50
    mode: box
    set_action:
      then:
        - lambda: |-
            id(dispenser_servo).write_position(x);
Off position ended up at 1700 and on position at 1200 for our fridge - your numbers will be different depending on how your case fits and where the button actually is.
What’s still the same
A lot of the original build carried straight over into v2 without needing to change:
- Weight-based fill measurement using the HX711 and a load cell - still the most reliable way to know how much water has actually gone into the container, independent of the container itself.
- The three fill-quantity buttons (350ml, 500ml, 720ml) plus a cancel button, using illuminated pushbuttons and double-click detection to avoid the phantom-activation problem from v1.
- The TM1637 seven-segment display, showing the live weight during a fill.
- ESPHome as the platform gluing everything together - it’s still the right tool for this, especially now that the parts that actually need testing have been pulled out into their own component.
What can be improved?
As always, there’s a list of things I’d tidy up given more time:
- The weighing plate needs to be metal, not printed. As described above, the current PETG plate flexes enough under load to occasionally rest on the bottom of the cubby, which can mask the actual weight and lead to overfilling - caught on camera overfilling a 500ml target by around 50ml. A thin sheet metal plate would be much stiffer for the same thickness, solving the flex problem without giving up any of the clearance we gained by making it thin in the first place.
- The plate should be angled to drain. Right now, any water that ends up on the plate - from a drip, or an overfilled container - just sits there instead of running off. Angling the plate slightly and directing that edge towards the front of the cubby would let it drain away instead of pooling.
Personalisation
Fresh off the printer, the new control box was a fairly plain expanse of black PETG on the front panel - which my eldest daughter took as an invitation. She’s very into dragons at the moment, and decided the dispenser needed a dragon sticker front and centre. So now the fridge dispenser has a dragon keeping an eye on things. Non-negotiable, apparently, and I have to agree it improves the design. You can spot it in the hero image at the top of this post.
What’s next
The family feedback on v2 has been great - everyone agrees it looks a lot cleaner, neater, and tidier than the original, and they’ve noticed the improved reliability too. It even survived a real-world stress test already: during a trip accident in the kitchen recently, someone knocked into it hard enough to rip the whole unit off the fridge. No damage done - it turned out the 2.1mm barrel power connector pulled free exactly as it was (unintentionally) designed to, acting as a sacrificial weak point. A quick plug back in and it was straight back to working, rather than snapping a mounting point or damaging the electronics.
For now, the combination of a servo that actually reports where it is, a hard timeout that can’t fail open, and a test suite that catches regressions before they reach the fridge, makes this feel like a proper “version 2” rather than just a patch on the original. And my youngest daughter still gets her water bottle filled without having to stand there holding it.